
It's a very exciting day for me! After lots of work and crafty fun, it's time to reveal all the contents of my first Quick Stitch Kit with Papertrey Ink. It's called Sewing Staples and has dies to create a scissor keeper, a needle book, floss bobbins, gorgeous and long awaited stitched flowers, as well as a kit exclusive stamp set with a coordinating die. And a few extra goodies thrown in here and there to make whipping these projects up a breeze.
The inspiration came from the absolute state of disaster all my sewing stuff has been in since I began designing the stitching dies. I could never find my scissors. My floss was a nest of tangles. I have lost more needles to my couch than I care to count. With my little kids, this just was all a no-go. Just not the safest situation. Especially with those runaway needles. So I wanted to create something that would tidy it all up.
I also figured that if I was such a mess, you probably needed some help in the sewing organization arena too. So the idea of sewing staples seemed like a good one for the inaugural Quick Stitch Kit. Let's get all neat and tidy and ready for a year or more worth of Quick Stitch Kits yet to come.
And here's the thing with creativity. You start out with one idea and follow that through. Then you realize that you can leap from the original one to a second and a third. So not only do all these dies make the items listed, but I'll be showing you today, tomorrow, and a few days between now and March 9th how versatile these dies can be outside of organizing your supplies. A very good investment for your crafty stash.
If you've clicked here from Nichole's blog, you know there is a lot of information over there. I'm going to go ahead and put up all the kit contents here so you have a quick reference while reading this post.
SEWING STAPLES KIT CONTENTS:
Custom Printed Tote Bag
Sewing Staples: Scissor Keeper die collection
Sewing Staples: Needle Book die collection
Sewing Staples: Floral Cluster die collection
Sewing Staples: Stitched Floss Bobbin die collection
Sewing Staples: Flowers die collection
Sewing Staples stamp set + label
(1) Wooden Bobbin Box
(2) Heavy white 8-1/2" x 11" sheets cover board
(2) Iron-on 8-1/2" x 11" Transfer sheets
(1) spool Fresh Snow Satin Ribbon-5 yards
(1) test tube white 8/0 seed beads
(1) pdf download with full instructions and links to online video tutorials
The total retail cost of the "Sewing Staples" Kit is $110. There will be a limited number of these exclusive kits available, so be sure to get yours while you can! Some individual items will be available for sale at a later date. The "Sewing Staples" Kit will be available for sale beginning on March 9th, only at Papertrey Ink. Read all the details on Nichole's blog or contact Customer Service with any questions.

Before I get you started with all the project, I want to get you a list of the video tutorials available on YouTube for this Quick Stitch Kit.
Needle Book Video Tutorial
Scissor Keeper Tutorial
Floss Bobbin with Iron On Transfer Tutorial
I've also have written, illustrated PDFs for you. On the first page of each PDF is a QR code that will take you to the corresponding video tutorial. Print out the PDFs and wherever you go with available Wifi and a smart phone/ tablet, you can easily bring up the video to help you out along the way. How great is that!?!?!?!? I've got you covered on content to help you get these projects done. (Man...I love technology! Isn't it amazing we are able to do this type of stuff? And I don't even have to get out of my pajamas to do it.)
Floral Cluster PDF
Needle Book PDF
Scissor Keeper PDF
Floss Bobbins with Iron On Transfer
OK...OK...OK...time to get to the fun stuff. All the projects!

I've created an entire suite of coordinating projects for my first example. These are the first ones I made and the ones I've been using ever since. I put them immediately to work. You can see a lot in this photo. We've got the bobbin chest with floss bobbins with iron on tags (sized to fit!) that are included in the kit. The kit exclusive stamp set and coordinating dies is used to decorate the inside of the lid. There's the inside of the needle book, and the scissor keeper with the motif from the Floral Cluster Die Set.
.jpg)
Let's talk about those felt bobbins. Basically, you can take your favorite PTI felt, the matching floss you've found at the store, and create these coordinating bobbins that fit in the bobbin chest we've included in the kit. If you run out of floss, just put your empty bobbin in your pocket book and head to the craft store to find the floss again! How great is that?
Six floss bobbins fit inside the bobbin box. I sized the die to fit this box specifically. Obviously, you probably have a lot more floss than this. Consider the bobbin chest your "working box". Fill it up with the colors you are using on your current project. and take it with you.
The bobbin chest comes in plain wood. I've painted mine with Martha Stewart Crafts Pool Paint mixed with the "stain bottle" to make the tint transparent for the wood grain to show through. It's a good match for PTI's Aqua Mist. Have fun decorating this any way you'd like.
.jpg)
Wondering about those iron on transfer tags? I've included iron-on transfer, Fresh Snow Ribbon, and the exclusive stamp set (with mirrored numbers!) in the kit for you. It's super easy and effortless. Check out the video to see exactly how I did it.
See...I told you it was easy:).

Next up, is the Needle Book with the Floral Cluster. I included a "holes only" die in the Floral Cluster Die Collection to create this EXACT motif that is sized to fit on both the Scissor Keeper and Needle Book. All the arranging and hole placement is done for you if you choose to use it that way. Or you can go "freestyle" too and create your own design. It's nice to have either option.

Here's a photo to show you how the Floral Motif also fits on the Scissor Keeper.
The motif is beautiful and includes lots of beading. We've included a test tube of opaque white beads for you to use to embellish your projects.
.jpg)
You have a die included in the Needle Book Stitching Collection that creates a line of holes for binding your Needle Book together.

The Needle Book closes with a ribbon tie. This is the same Fresh Snow Ribbon that you used for your Floss Bobbins.

The ribbon is sewn in and secure with the Ribbon Slit die, also included in the Needle Book Die Collection.
.jpg)
You have a pocket for threaders. This pocket is also sized to fit a single floss bobbin!
.jpg)
There's a channel pocket for keeping your pins and needles secure. And you have a needle keep strip as well.
I used bits and pieces from the Floral Cluster Die to add "freestyle" floral motifs to these inner pages.
How will you use all the elements? You can certainly change things up to suit your needs. Move pieces here or there. Very customizable. Let me show you that a little bit with the Needle Book I made in the video tutorial.
.jpg)
This is the Needle Book I created in the video. The floral motif from the Floral Cluster Die Collection is freestyle here on the cover and I added beads to the flower center.
.jpg)
Not much different here, but I wanted to show you that my pocket holds a coin thimble. I got this at Hobby Lobby. Thought it was a great find since it is flat.
.jpg)
I decided to make a larger opening for my threader in the Channel Pocket here by just not stitching down all the channels.
I have a lot more ideas for variations that I'll be showing you on the blog between now and March 9th!
.jpg)
My daughter has been very interested in what goes on in my office lately. (And the kitchen counter, sofa table, end tables, play room couch for that matter. These projects are super portable.) She requested her own scissor keeper! Too cute. This one, in shades of Raspberry Fizz and Hawaiian Shores, is the one I created on the video tutorial. It's semi-laughable that they hold a pair of safety scissors, but she seems quite pleased with it. Personalized scissor keepers would make a great back to school gift for the little kids in your life.
.jpg)
A close up to show you a beading variation on the flower. I used the beads included in the kit and added them to each of the holes in the shamrock style flower center. Great way to change it up.

I took the Straight Edge Liner side of the Scissor Keeper Dies and cut two Pure Poppy felt cuts and two Tropical Teal felt cuts. When I originally rough cut the felt down before running it through my die cut machine, I purposely trimmed my felt so the handle would only be cut a little bit. I didn't want to waste any felt, as I knew that I wasn't using the handle part on this project.
Once all four pieces were cut on the die cut machine, I had to trim off whatever bit of the handle I did end up die cutting so I would have a neat, straight line at the top of the scissor keeper.
Before I stitched this one together, I cut details into one Tropical Teal felt cut with the Coffee Cozy Detail Dies and the Stitching Lines to come up with this boyish twist.

I wanted to show you how you could take some of the elements in the Sewing Staples Kit and use them outside the basic sewing organizational theme. First up, I have this piece of wall decor in a trendy color combo. I cut lots of leaves and flowers out of shades of Dark Chocolate, Autumn Rose, Canyon Clay, Autumn Rose, Scarlet Jewel, Terracotta Tile, Aqua Mist, Ocean Tides, and Classic Kraft. ( In other words, what colors didn't I use?:)
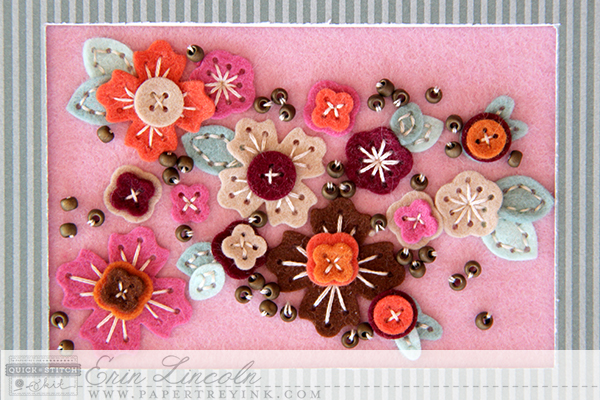
These all got sewn on a piece of Lavender Moon felt. Dark bronze beads from the craft store got sewn in as well. Here's a close up in case you want to do this yourself. It is sized 4x6.
I covered a 4x6 mat board with Ocean Tides Simple Stripe Paper and adhered that on top of the felt. I then adhered the felt and board onto a laser cut wood frame that I painted dark brown.

This piece is going in our master bedroom on a bookshelf, but it would make a lovely gift. Why not make a matching mini card with the kit exclusive coordinating Sewing Staples stamps and dies? And is that making up that mini card with the lovely stitching along the parameter? It's the Needle Book Dies! This works really well because if you use both the straight edge rectangle and the scalloped liner, you can face the two scratched up sides (created by your cutting plate) of the die cuts together. Both the outside and the inside of the card are pristine and perfect.

One last project to leave you with today. I use the Scissor Keeper Dies to create this tussie-mussie style paper pocket to hang off a gift bag handle. It holds pink star shaped lollipops that I got at Target. They also have flower shaped lollis at Michaels. Can you imagine an entire lollipop bouquet on a gift? The kids would go nuts.

To create this cone pocket, I cut two Hibiscus Burst scalloped liners and two straight edge covers out of Aqua Mist Bitty Dot Patterned Paper. For one set, I cut off the handle. Then I just stitched them up. Added embellishments from Get a Handle On It Die Collection, Limitless Layers 2.25" Ovals, and the new 2015 Birthday Tag stamps polish this packaging off in easy style.
To hang off the bag, I looped some crochet threat through the handle of the tussie mussie and tied that to the handle of the bag. Very simple and easily removable.
Lots of "tussie mussie" ideas running around my head. You have not seen the last of these from me! Imagine the stamped and paper pieced die cut bouquets you can make to go inside? Or filled up with candy canes during holidays? Or maybe some wrapped cake pops coming out of it for a birthday gift? Or put on a Christmas tree with a little toy hanging out? How about an orange and green one as a spring time carrot for Easter? See...too many ideas! My head is spinning.
I have some more ideas to share tomorrow with you. This blog post has just gotten too long! I have three cards I've created with all these elements. Pop by tomorrow to see those.
In the mean time, the Quick Stitch Team has been getting all crafty as well. This is our big reveal! Can't wait to see what they've come up with. I'll be right there with you this morning by clicking on over to take in the eye candy.
Tracy Miller
Hilary Kanwischer
Rebecca Luminarias
Lizzie Jones
I hope you like this kit as much as I do! It will be available to purchase on March 9th at Papertrey Ink! Looking forward to a great year of Quick Stitch Kits with you!:)
Supplies
Full Ensemble:
Quick Stitch Kit (including Scissor Keeper, Needle Book, Floss Bobbins, Floral Cluster, Sewing Staples Stamp Set, Sewing Staples Stamp Set dies)
Floss: Aqua Mist, Simply Chartreuse, Limeade Ice, Autumn Rose, Harvest Gold, Melon Berry, Vintage Cream, Ocean Tides, Pure Poppy, Hibiscus Burst
Ink: True Black, Aqua Mist, Autumn Rose, Melon Berry, Ocean Tides, Harvest Gold
Raspberry Fizz Needle Book + Hawaiian Shores Scissor Keeper
Quick Stitch Kit Contents: Needle Book Dies, Floral Cluster, Beads, Ribbon
Felt: Raspberry Fizz, Simply Chartreuse, Harvest Gold, Vintage Cream, Pure Poppy, Hawaiian Shores
Star Scissor Keeper
Quick Stitch Kit: Scissor Keeper Dies
Other Dies: Coffee Cozy Detail Dies, Stitching Lines Collection
Felt: Tropical Teal and Pure Poppy
Framed Floral Piece + Card
Quick Stitch Kit: Floral Cluster Die Collection, Needle Book Collection, Sewing Staples Dies
Patterned Paper: Ocean Tides Simple Stripe, Lavender Moon Polka Dot
Ink: Terracotta Tile, Scarlet Jewel, Autumn Rose, Dark Chocolate, Ocean Tides
Felt: Dark Chocolate, Autumn Rose, Canyon Clay, Autumn Rose, Scarlet Jewel, Terracotta Tile, Aqua Mist, Ocean Tides, and Classic Kraft
Lollipop Holder
Quick Stitch: Scissor Keeper Dies
Cardstock: Hibiscus Burst, Stamper's Select White
Patterned Paper: Aqua Mist Bitty Dot
Stamps: 2015 Birthday Tags
Other Dies: Seeing Stars, 2.25" Limitless Layers Ovals, Get a Handle on It
Erin!! Perfection. This is the perfect "kick-off" to your new line. I love the scissors keepers you made for the kids, too. Congratulations!!
ReplyDeleteOh Erin this first kit is just amazing and adorable!! I am so impressed with your pdf files which are going to be so so very helpful ... you thought of everything!!
ReplyDeleteErin, your creative mind must be on fire. This kits is awesome and I can't wait order it.
ReplyDeleteOh Erin your creative mind is awesome!! I love all you have done and can not wait to create with your dies!! Just amazing!! Thank you for all your hard work!!
ReplyDeleteYou're awesome, Lady! Congratulations on your first kit reveal!
ReplyDeleteAbsolutely incredible Erin!! It's so easy to see the amount of attention to detail and love that was put into developing this kit! You've thought of everything! The video tutorials were fabulous and so easy to follow. Can't wait to see what you come up with next! And I hope you don't take offense but you keep using the word 'parameter' when I think you might mean 'perimeter'. I kept hearing it in your videos but I thought maybe it was your accent but you use it here on your blog too. Just tryin' to help a girlfriend out. :)
ReplyDeleteLove. LOVE. This is a fantastic kit and you obviously put a lot of time and thought into it. The darling lollipop bouquet pocket put me right over the edge. (Ah heck, I already was at the first sneak peek.) I can't wait to see more!
ReplyDeleteSo sweet Erin! Love the needle holder, seems like I'm always looking for one...
ReplyDeleteErin, you are a creative genius! Looks like you pretty much covered it all in the lines of sewing.Your projects are fabulous and love that your kids are so enthused they want their own scissors keepers. : )
ReplyDeleteWOW ERIN!! You are amazing!! LOVE everything about this kit!!
ReplyDeleteErin, congratulations on your Quick Stitch kits. You really are a visionary with these. As a quilter, I love how easy it will be to make some thoughtful (and useful) keepsakes for my quilting friends.
ReplyDeleteForgot to include in my other comment that your pdf documents are wonderful! Thanks so much for putting those together.
ReplyDeleteOh, this is going to be so much colorful fun!
ReplyDeleteI CAN'T WAIT! Congratulations on what will surely be a sell out kit! You have truly thought of everything! I am looking forward to making everything for myself (first) and then for gifts for some of my crafty friends. So excited! Now I just need to decide what colors of felt to use!
ReplyDeleteLinda
Erin, everything looks so beautiful!
ReplyDeleteWhile I was watching the videos, I was thinking of my mom, she was a very talented lady who loved sewing. I know she would have been a fan of yours, just like I am... big fan.
Congratulations for this new project and for the chance we have to enjoy the fruit of your talent.
This is such an amazing kit. They are adorable and would make great inexpensive Christmas gifts. And the kit is out now so we have all year to work on them. Including them in birthday cards would be a great idea also.
ReplyDeleteI wish I had seen the full kit, I did buy every sewing die and found some antique stork embroidery scissors for all 5 needle books I'm working on. The PDFs you made are awesome, it was a bit harder (but more enjoyable to watch the videos) to wrap my head around. I also found 5 antique needle threaders too. What size buttons are you all buying? I did get some but I'm not sure they will be the right size. It would be a great idea if there was a place for us to post photos of our work.
ReplyDeleteBlessings all