Wednesday, September 28, 2011

Happy Birthday Matt!

Mostly, I'm here to recommend a cookbook. I've had the tendency of late to check them out of the library, bring them home to peruse over breakfast and lunch, and then heading over to Amazon to order my own copy. Really, not something I'm going to feel guilty over. Everyone needs food, right? And good food is an even bigger plus.

I love to bake. Hank loves to pitch in. All fine and good. Only problem is that if there is even a single leftover cookie in the house, I'll hover around it like a bee to a flower. And when is there only one cookie? There is usually a few dozen. So to spare myself calories, I don't usually bake.  

Enter Small Batch Baking for Chocolate Lovers. It was a library find. I ended up buying two--one for me and one for my mother. And it is on my short list for future gift giving. There are recipe inside for eight chocolate chip cookies...or three cupcakes...or a single tart to be shared by two...or in today's case, tiny little chocolate cakes complete with icing. Just enough to ease your sweet tooth, but not to heave on the guilt. I've made two of the recipes so far and have found that I have enough dough or icing to make the recipe, without having to scrape the bowl for that last 1/4 tsp. That was main concern, which I no longer have. And so very yummy.


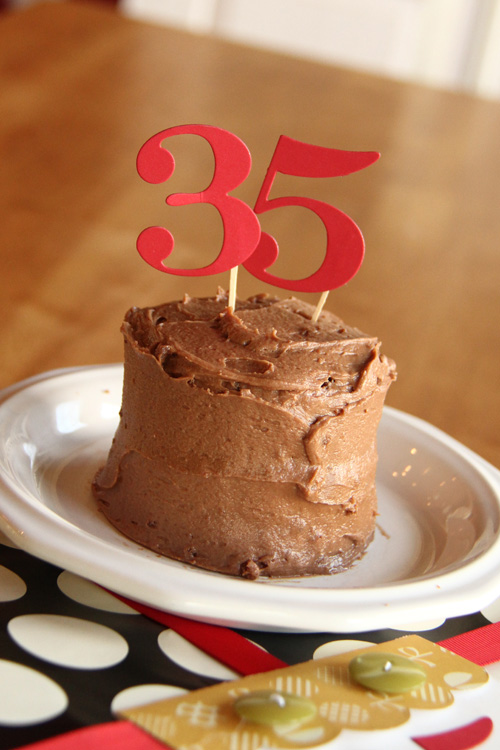
Today's Matt's birthday. I recycled two tin cans (originally held black beans) and ran them through my dishwasher for my "cake pans", as suggested by the author. Followed the directions. Melted a large bar of chocolate to use for both the cake and the icing. You know it's going to be good when it calls for "premium quality chocolate".  I wrapped a gift, decorated a tag, and created a cake topper. And had time to spare at naptime. Whoo! 

And best of all? I'm not going to be "squaring up" the cake at 11 o'clock when I go to bed and again before breakfast. We ate up all the cake tonight, just enough for the four of us. 


Now, if I can only find a way to package up these little cakes. I think the By the Numbers dies make the perfect scaled toppers. Like seriously, a cute little cake that matches the gift? Bring it. 

Other than that, Happy Birthday to the man who makes me laugh on a hourly basis, likes to sit in a parked car in our garage for long chats while sleepy children snooze behind us in carseats, and who always makes my coffee in the morning. Love you heaps and heaps. And I'll be down in just a few minutes so we can binge on The Good Wife. :)

PTI Supplies:

Buttons: Simply Chartreuse

Tuesday, September 20, 2011

Follow Up Baby To-Go Bags

I created a single Baby To-Go Bag back in June for one of Papertrey's Team Projects. You can see it here.  Seeing absolutely no reason to reinvent the wheel, when it came time for me to actually go to a baby shower, I took the idea and ran with it. Thought I'd share another version today with you.


Here's the project as a whole. I bought a basket at Joann's. It fits six of the canvas drawstring bags. Well, actually, we cut and made the bags to fit. They are probably 8x10 inches when made up. Large enough to hold a diaper and a travel size bag of wipees.


There are two types of bags. The ones with the baby food jar (PTI's jar die) are labeled 1 though 3 (with the By the Numbers die). All patterns you see are fabric. You can cut fabric with your dies quite easily if you have fused Heat N' Bond onto the back.

 My mom did all the sewing for me. She did an amazing job. I love it when we put our heads together like this. The baby food jars hold a pouch of organic Sprout baby food, one of those fruit puree packets with a spout, a travel size packet of formula, a disposable bib, and baby spoon.


For the onesie bags...same deal. They are number and there are three of them. The big onesie is cut with PTI's Onesie die. These bags have a diaper, a new onesie, and a travel sized pack of wipes. Come to think of it, a little travel sized bottle of hand sanitizer would have been a nice addition here. Next time.

The idea behind these Baby To-Go Bags is that the parents can grab them and go when they need to get out of the house quick. They have all the baby essentials already to go. The numbers help you know when you need to take a few minutes to restock them. If you are bag number 3, it's time to get them reorganized again. And besides all that, the numbers are pretty cool to look at.


Extra formula packs and disposable wipes are stored underneath the bags in the basket.


For the decorating, I just cut a Mat Stack 4 die and stamped with the Mat Stack 4 Collection stamp, a duck from Night, Night Moon, and a sentiment from Inside/Out Sentiments: Baby.


The matching card (it matches the onesies on the bag!) is again cut from the Shape It Up Onesie die and stamped with Polka Dot Basics, Little Labels, and a sentiment from Faux Ribbon. I used Aqua Mist and Harvest Gold cardstock here.

All in all, a cute and very practical gift. I'd have been thrilled to get this and I hope little Anya Eleanor's mom loved it as well.

Tuesday, September 13, 2011

Holiday Photo Finishers


Where do I even start tonight? There is so much to say about the new Papertrey Ink Holiday Photo Finishers. Have to collect my thoughts. OK...so here's the deal. I'm a Shutterfly girl. I get pre-printed photo cards with extra photos and messages printed inside (I believe they are called Storybook cards). It's been a bit of a no-brainer for me. Easy-piesy lemon squeezy...they are done without much hassle. But I've always felt just a wee bit guilty not making something homemade. I'm mean...come on...I'm the professional crafty type. Where's the love when I really need to show it? Reminds me of the cobbler's children going without shoes and all.

This year, I'm going homemade. And that's because of this set of stamps and the dies. Oh...and the fabulous tri-fold card! I'm a bit wordy when it comes to catching everybody up to our yearly activities. And there is nothing I like better than getting a nice letter in the mail from loved ones and holiday time. The tri-fold lets me be wordy and crafty and just a wee bit clever because it is so darn easy. Let me show you.


Here's the photo front of my card. I used Dawn's Candy Cane Christmas paper and stamped with this lovely sentiment. I LOVE LOVE LOVE LOVE these dies. So many uses. The embossed lines are so money.


Just for a bit of crafty goodness--not much mind you, this has to be easy to make it multiples--felt holly leaves. The glittery center "berry" is from some Stickopatomus stickers I got at Michael's.


Flip the card over and you have a sentiment from Inside/Out: Holiday. It fits inside the Mat Stack 1 Layerz. Additional holly serve as brackets. As a personal touch, I signed our name.


For the first flip of the card, you get a photo of my favorite buddy and a little ditty about him. I created all of this on my computer (including the red label) and just printed it out on printer paper.


When opened all the way, photos and info for the rest of us. A few holly just for color. All four "people panels" were printed on one sheet of paper. How easy would it be to print as many as you needed? Really, most of the work is done at once on these. Multiples are easy when you print and cut the majority of it and just add a few special paper crafting touches.


For another project, I went with something non-holiday themed and used Flutterby Friend. Did I mention I love the Photo Finisher dies? Imagine the possibilities. There are so many sentiments that fit in them. This one is from Little Labels.


A close up. There's the Mat Stack 1 shape. Which had me pulling out Mat Stack 1 Collection to reinforce the theme. Fits nicely.

There's a bow from Maile's Bells & Boughs. Oh my good gravy. Those bows are on a lot of my projects this month. The perfect touch for somebody who doesn't use a lot of ribbon.

I hope you are as excited as I am over this set this month. And are already thinking about your holiday cards. Start them now--avoid the stress and rush in December. And kick back with a mug of hot chocolate instead of pulling your hair out trying that done during the hustle and bustle of the holiday.

Looking forward to seeing everyone else's projects. Down right giddy about it. Hop on over to see what they are up to as well:

Nichole Heady
Jessica Witty
Betsy Veldman
Dawn McVey
Heather Nichols
Lisa Johnson
Melissa Phillips
Michelle Wooderson
Maile Belles
Danielle Flanders

Supplies:

Holiday Card

Stamps: Holiday Photo Finishers, Inside/Out: Holiday, Library Ledger Year Additions
Cardstock: Simply Chartreuse
PTI Tri-fold card
Dies: Mat Stack II Layerz, Holly Jolly
Ink: True Black, Pure Poppy, Ripe Avocado
Patterned Paper: Candy Cane Christmas
Felt: Simply Chartreuse
Other: Digital labels (my own design), glitter epoxy stickers by Stickopatomus

Hello Friend

Stamps: Flutterby Friends, Bells & Boughs, Mat Stack 1 Collection, Little Labels
Cardstock: Scarlett Jewel, Autumn Rose, Stamper's Select White
Ink: True Black
Dies: Edgers #4, Photo Finisher Strips, Bells & Boughs
Button: Blueberry Sky
Copic Trios: Scarlett Jewel, Enchanted Evening, Ripe Avocado


Sunday, September 11, 2011

Love Lives Here for the Holidays

Ho! Ho! Ho! Merry Christmas! It's the most wonderful time of the year.

What? It's September and Christmas is months away? Nah, not at Papertrey Ink. September kicks off our creative holiday season for a few months. And I'm here today with my first group project of the release. We're featuring the new Love Lives Here: Holiday. It's just as fabulous as the original in all it's vintage, homespun glory. And dies! Oh good gravy...the dies. The dies are always the cherry on the sundae, right?

Now, one of my favorite parts of the holidays is the ornaments on our tree. Pulling each one out of the box conjures up certain, specific memories for me. And every year, starting just about now, the kids and I stop by Hallmark every time we're at the mall so we can start planning which ornaments we are going to buy. It's our tradition to buy one special ornament per family member every year. Hank LOVES deciding on which one is going to be his. It is quite the decision.


The beloved ornament idea got me thinking about the type of project I wanted to create for today. It would be really neat to make a commemorative yearly ornament to hand out as gifts. And every year, you'd make a new one. With a good stamp set (like Love Lives Here: Holiday), you could have enough different shapes and sentiments to keep them unique for a few years. Perfect.


Now, I have a little trick with chipboard to make sturdy, long lasting ornaments.. Using dies (such as this angel die), cut multiples out of thin chipboard. The thickness of a cereal box. Or, if you are super duper thrifty, there is absolutely no reason not to use a cereal box for this project. For my ornaments, I used six layers of chipboard and one layer of cardstock. The result is an 1/4" thick die cut shape. Sturdy enough to hold up for years. Fabulous. I used spray adhesive to evenly coat them with sticky stuff before stacking them together to dry.


After that, I stamped my pieces, aged them with vintage ink, and tied a ribbon in the hole. When Tag Sale #4 came out, everybody commented on how it looked like a Christmas ornament. I just went with that and used it here. Both sides are stamped. And I included the year to date the ornament (Library Ledger Year Additions) and a sentiment (Faux Ribbon seemed to fit my needs nicely). Subsequent years will have the appropriate date to make them more commemorative. Can you tell how sturdy these are? Isn't that angel great?


I packaged one ornament in a clear card box and embellished the front. I wanted to make it look like the ornament was hanging from a tree branch. Maile's new Bells & Boughs suited just fine.


Up close of the label. Lisa's new Christmas labels are perfect for longer sentiments.


Just a little shot of the contents of the box. I made a little patterned paper filler box on the bottom to take up some space and make it seem more professional.


And of course, we've got to have a matching card. I used this Impression Plate technique to block the embossing from the Impression Plate. It helps mimic and reinforce the ornament theme.

Hope you enjoyed my project and are inspired to start thinking about Christmas gifts. It really is just around the corner. For more ideas, blog hop over to my esteemed colleagues virtual homes and see what they are up to using Love Lives Here: Holiday. Guaranteed to blow you away.


Nichole Heady
Jessica Witty
Betsy Veldman
Dawn McVey
Heather Nichols
Lisa Johnson
Melissa Phillips
Michelle Wooderson
Maile Belles
Danielle Flanders


Supplies

Box

Stamps: Love Lives Here Holiday, Christmas Labels, Bells & Boughs
Cardstock: Spring Moss, Autumn Rose, Scarlet Jewel, Vintage Cream
Patterned Paper: Pacific Vineyard
Ink: Scarlet Jewel, Ripe Avocado and Fresh Snow
Ribbon: Bitty Dot Autumn Rose
Versamark

Card

Stamps: Loves Lives Here, Christmas Label, Faux Ribbon
Vineyard Impression Plate
Dark Chocolate Satin Ribbon
Edgers Dies #4
Spring Moss, Autumn Rose, Scarlett Jewel, Vintage Cream Cardstock
Love Lives Here Dies
Christmas Label Die
Dark Chocolate, Ripe Avocado, Scarlet Jewel, and Fresh Snow Ink

Ornament

Stamps: Love Lives Here: Holiday, Faux Ribbon, Library Ledger: Year Additions
Vintage Cream Cardstock
Scarlet Jewel, Dark Chocolate, and Ripe Avocado ink
Dark Chocolate Satin Ribbon
Cardstock
Dies: Love Lives Here: Holiday, Tag Sale #4, Love Lives Here


My Favorite Weekend of the Year

This weekend is my favorite of the entire year--Yard Sale Weekend! It happens to be a yearly juried craft festival this weekend in the town park, but that seems to have taken a backseat to all the wheelin' and dealin' going on. Everybody saves their junk/unwanted stuff and puts it out on the driveway. And for a mama with two little kids it is windfall of cheap, affordable toys. I really see no reason whatsoever to buy toys new. That's not to say I don't for birthdays and Christmas, but all the big stuff on my list, I pick up for pennies for a dollar the second weekend in September. Let me show you what I mean. A little scene from my backyard last night:


Let me break it down for you:

Picnic Table: $5
Water Table: $8
Cozy Coupe: $5
Slide thingy: $2 (!!!!)
Soccer Goal with 4 Soccer Balls: $4
Car Ramp Mountain: $8
Trampoline: $20 (yep...I splurged here, but it was brand new)
Sandbox: $5

That's a whole lotta outdoor fun for cheap. 

There's a whole bunch more. I filled my car three times. One of my favorite finds this year was a vintage gumball machine for $5. I have a plan for that. We'll put it to use. But that's another blog post. 

Now, granted...this is a whole lotta crap. It needs to be stored. Luckily, we have an unfinished basement. A messy unfinished basement. But the kids are only little for so long and before you know it, I'll be selling everything and making most of my money back. And cleaning out my house. We do a yard sale too every year too. We're just considering all this as rentals. It comes in and it goes out. Try it out--you'll be amazed by the fun you and your kids can have for very little money. And the thrill of the hunt is a bit addictive too. 

When I wasn't madly finding bargains, I manned our yard sale this year. I had a great deal of craft supplies to move. This is our fourth year doing so and I've seem to have developed a reputation. Get the same customers back. I'm sure I'll find all my stuff on tables in a few years as other people try to sell it! Things were sort of slow during my shift, so I got to work stamping. Or should I say "demo-ing". Nobody showed up to see it, but I had fun...


Ever since I made this card, I have a thing for pockets. Was happy to see this stamp set available. Matching dies too!

Supplies:

Polka Pocket:
Stamps: WPlus 9 Pocketful, PTI Background Basics: Retro, Mega Mixed Messages
Dies: WPlus9 Pockets
Pure Poppy and True Black Ink
Echo Park Dots and Dashes 6x6 Pad

Sunshine Pocket
Stamps: WPlus9 Pocketful, PTI Background Basics: Retro, Bitty Background Blocks, Simple Sentiments
Dies: Banner Builders
Ink: Pure Poppy by PTI, CTMH Sunshine and Crystal Blue


Tuesday, September 6, 2011

They Haven't Seen the Likes of Me...

Hank started preschool today. CRAZY! I was the one having the separation anxiety. He, on the other hand, forgot I existed the second he walked in the classroom. You know, I wouldn't have it any other way.


He's required to have a tote bag with his name on it. Well....that's all I needed to hear. Busted out the craft on it. I want him to think he's got the coolest tote around. Used my Silhouette and the heat transfer vinyl. Sweet.

I got to be careful not to let all my super crafty powers be known. I might start getting volunteered for stuff.:) There's a reason why I'm on the library committee and not the bulletin board committee...if only for variety sake. I need to diversify my interests sometimes. But you know what? I'm just about giddy with the thought of making party favors for his class and Christmas gifts for his teachers. I have a feeling, I'll be showing myself before too long. Just can't help myself. You know what I mean, right?:)

Speaking of books, I've got a good one for you readers out there. Could not put it down. The Sea Captain's Wife. Still thinking about it really. If you are in the mood, go for it.