
Welcome to Papertrey Ink's Stamp-A-Faire 2013! We've got so much planned for you today that your head might spin. In a good way, of course.

Let's start out this morning with a little caffeine. This hour's feature is on tea staining. I thought I'd put just a wee spin on it by swapping out the tea for coffee. You might have a little bit left over in your coffee pot at this very moment. Go ahead and get it! Oh-so-thrifty. Pretty much works the same as tea, but with some more color intensity.
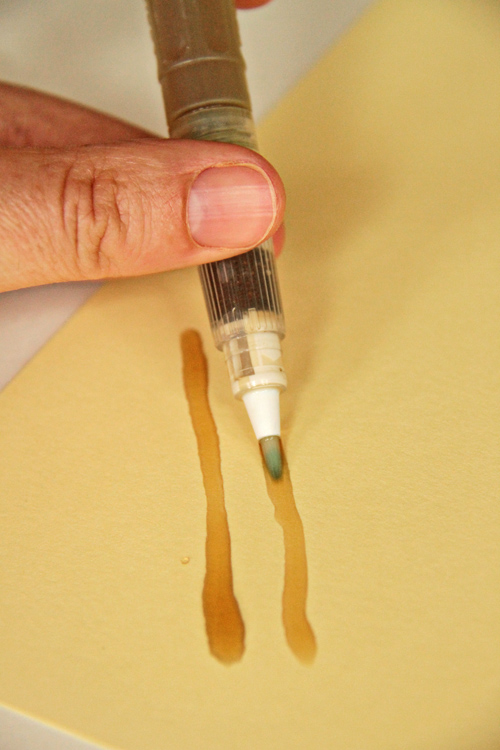
You can use a paintbrush or a waterbrush like I did to get the coffee from your mug to your paper. I preferred the waterbrush for this technique because I could just fill up the barrel with the coffee and squeeze. Easy application.

Don't be afraid to apply heavily. Capillary action will keep it from spreading out too much and those fat droplets will add some dark variation when this dries.

In my project, I created a crosshatch design on Lemon Tart cardstock.

Let dry. This happens pretty quick. But you can speed up the process by placing it in the heat/sun. Depending on how much liquid you have on your paper, you might not want to use a heat embosser. I'm afraid it would blow things around to much, distorting your design. While it is drying, get all your other elements together and assembled.

Here's my finished project. Naturally, I thought the perfect compliment to a coffee/tea staining project would be Tea for Two and Tea for Two Additions. Floral Folk Art accented my porcelain and was carried over into the background to tie it all together.

Love how the Dark Chocolate ink used on the sentiment matches the edges of the coffee stained lines. Rich and detailed.
Hope you enjoyed this little tutorial. Go get your coffee and get to work. :) I'll be back by 10 with another project.
Supplies:
Stamps: Tea for Two, Tea for Two Additions, Floral Folk Art, Fancy Flourishes
Cardstock: Fine Linen, Spring Rain, Lemon Tart, Stamper's Select White
Ink: Dark Chocolate, Kraft, Harvest Gold
Patterned Paper: Spring Rain Bitty Polka Dot
Vintage Cream/White Buttons
Dies: Fabulous Frames, Tea for Two and Tea for Two Additions, Filigree Border
Erin, this card is so lovely! And what a brilliant way to add embellishment to the card with the coffee. Loved the tutorial! Thanks for sharing!
ReplyDeleteSo many things I keep finding on this card that I love about it! And I love the idea of using coffee in one of my water color pens!!
ReplyDeleteGorgeous card Erin, collecting the coffee next. Love this.
ReplyDeleteWhat a beautiful card, Erin! Going to try coffee AND tea staining for the challenge :) TFS!
ReplyDeleteThis is gorgeous Erin!
ReplyDeleteGreat idea to fill up the waterbrush with coffee. Makes the process go so quickly.
ReplyDeleteErin this is so beautiful! I love how you incorporated the folk art florals into the teapot and cup! And the coffee design turned out lovely! Love the ease of the waterbrush too...and we always have coffee! :)
ReplyDeleteI don't know how I missed this on Saturday! It's "TEA-lightful!" Love this. ��
ReplyDelete