

Here is a new Stitched Key Fob with the Medallion 1 Die. Laura, Dawn, and Heather did a great job yesterday showing you how you don't have to use the two new medallion dies as they are assembled in the examples. Instead, they are delightfully open to a bit of interpretation. I used the "holes only" die from the Medallion 1 and stitched it with various colors of floss. Or I could have used one color. Or I could have added an additional shape between this version and the fully assembled version. Bottom line, no two need to look alike and you can be challenged to come up with new ways to use them whenever you want to make a project.
I'm not using a D-ring on the two Stitched Key Fobs I'm sharing today. Instead, I'm using 1 inch Key Fob Hardward. Do yourself a favor, DO NOT purchase at a craft store. Too expensive. I paid $7.99 for four of them locally and then found 50 for $14.99 on Etsy. Big difference. I recommend this seller. She might be a little more expensive than some on Etsy, but she is shipping from the US, not Asia. It was worth the few extra bucks. I had my order in hand and ready to use within two business days. WOWZA!
You can get a special "key fob hardward" plyer set that helps you close these up. I opted out of that and just placed the fold of my key fob between the opening of the bottom part of the hardware and then used a large acrylic block to help me leverage it down. Really not a big deal.
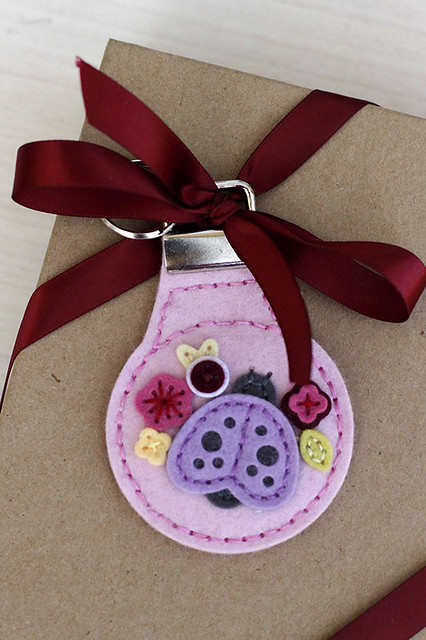
And here's another Stitched Key Fob with key fob hardware. I wanted to show how they work great as "tags" on gifts. I usually like to make something homemade to give along with a store bought gift (usually a book...big into giving books), so this is a great way to package the two together.
Instead of using a Medallion 1 or 2 die here, I opted to use the Seasonal Stitches: Ladybug. I also combined it with the Floral Cluster 1 Die. This is available in the Quick Stitch Kit: Sewing Staples Kit and will be available tonight individually as well.
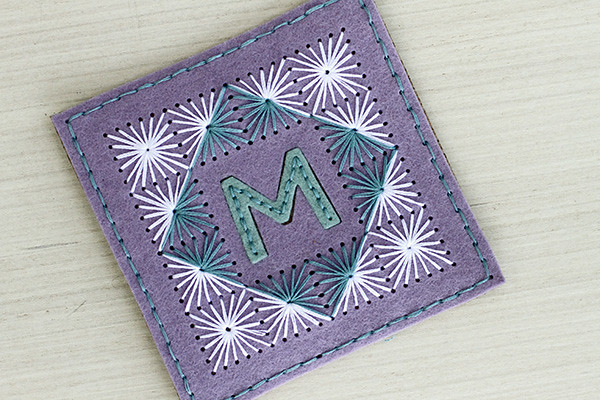
And for my last share today, a coaster using both the Stitched Coaster Dies and the Stitched Coaster: Square Flare Die. Look how different you can make this look with your floss design. This was the exact same stitching as I did for the rainbow coasters yesterday, just a different color motif.
A little advice on the coasters, because I've tried to do them before with other stitching dies and learned a thing or two. You want them to be as flat as possible. So the layering of a bunch of felt on top of the surface isn't going to work too well. It will create bulk that might make your glass/mug/cup unstable. We don't want a spill. So I did something new here when I added in the Sew Simple Alphabet 1. I used the inlaid die technique you usually see with paper by cutting the "M" into the Winter Wisteria felt background and then putting in an Ocean Tides "M" like a puzzle piece. Because this coaster is backed with cork sheeting, I can put a bunch of double sided tape in that area and keep it all together. And now the coaster is monogrammed and the surface flush. YAY!.
Happy shopping tonight.:) All these new products will be available in a few short hours at 10 PM EST at www.papertreyink.com. Thanks for interest!
Great projects as always, but I especially love the ladybug key fob and the coaster. I will have to try something like this when I get those dies! I just LOVE your stitching dies!!!
ReplyDeleteThis post sent both these new die sets right into my shopping cart, along with both of your Sew Simple alphabet sets. You are an amazing designer Erin! Keep em' coming!
ReplyDelete