
A quick run down of all the new dies:
Hoopla: Stitched Circle Bases dies
Hoopla: Stitched Scallops dies
Hoopla: Stitched Banner dies
Stitched Cupcake dies
Stitched Smile Cloud dies
Stitched Rainbow dies
Stitched Sunshine dies
Tiny Stitched Alphabet Blocks dies
Tiny Stitched Alphabet dies
Stitched Circle Holes dies
Let me show you what I'm talking about.
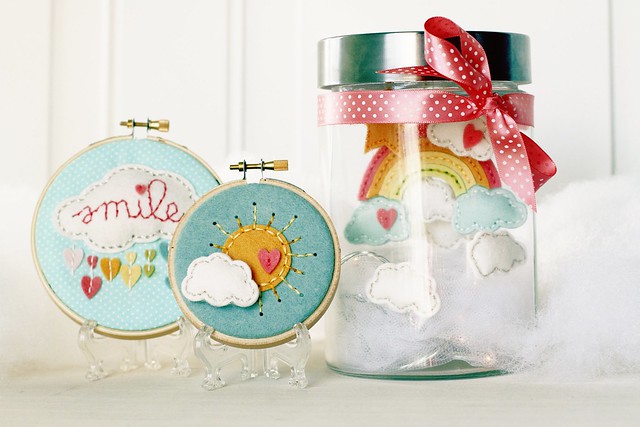
There is a bit of a spring weather theme this month with a Stitched Rainbow, Stitched Smile Cloud, and a Stitched Sun. I made this ensemble that includes two hoops and a rainbow nightlight for my daughter. It will go on a little table together in her room.
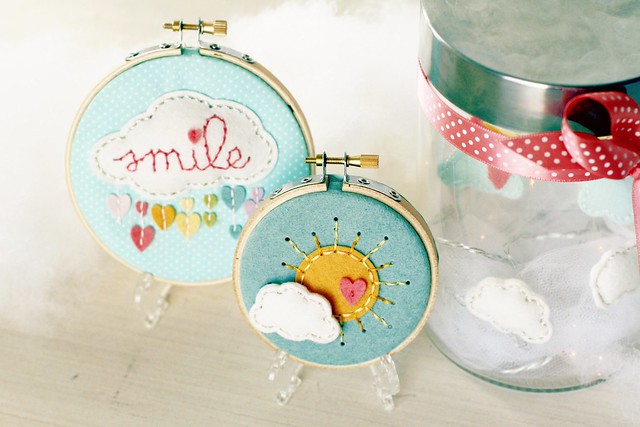
To focus first on the hoops, the smaller 3" hoop features the Stitched Sun, a small cloud from Stitched Rainbow that was stuffed with Poly-Fil and hot glued on, and a heart from Stitched Smile Cloud on an Ocean Tides felt backing. Because the width of our felt is 5", it is ideal for 3" hoops.
The "Smile" hoop shows off the Stitched Smile Cloud dies. All the elements are separate from the word "smile", to the heart raindrops, to the cloud, and even the "holes only" for the rain. This is a 4" hoop that uses fabric as the base layer that's been treated with Heat N' Bond. I was able to use the "holes only dies" on the fabric directly thanks to the stabilizer. The big cloud is stitched into the fabric. I puffed with up with Poly-Fil before completely closing it up.
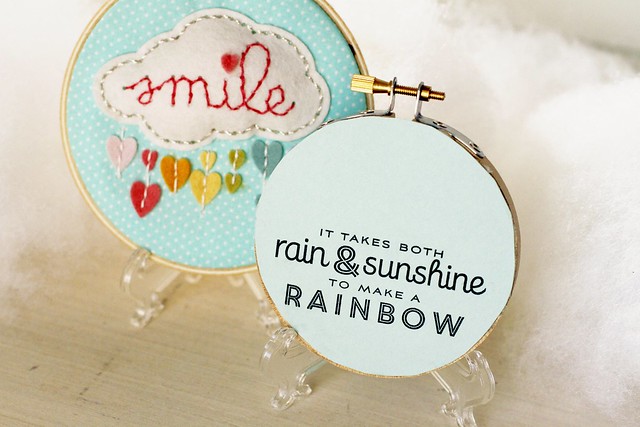
The backs of all the hoops are finished for a clean, tidy look using cardstock. You even have an opportunity to add a sentiment here! FUN! This one is from Blue Skies. This little 3" hoop with these dies and sentiment is something I'm going to make a bunch of to give as gifts for when I need to hand out a little pick me up. I already need two more ASAP.
Here's a quick video to show you how to finish off your hoops in a similar manner.

And how about that nightlight?!?!?! I've had this idea for a long time and really the main reason I wanted a stitched felt rainbow. The Stitched Rainbow die was used two different ways. First, obviously, is the rainbow. Secondly, the little clouds can be cut separately, so I cut several of those and stuffed them with Poly-fil. The little hearts are from the Stitched Smile Cloud. And I also have a star from the Coffee Cozy Details Collection.

These felt pieces are strung on silver floss and attached to the inside of the glass with washi tape. They hang like a little mobile in a jar. This image isn't real pretty, but I thought you'd want the visual how-to. Also, the lid isn't very tight on the jar, because I found that these little hanging pieces tend to get wrapped up around each other as you screw on the lid. To cover up the gap created, I tied some Berry Sorbet Dotted Satin Ribbon adding both form and function.

I have a set of mini-lights twisted up on the bottom with a length of white tulle. To make the lights actually light up and the switch easily accessible took a little ingenuity and two trips to Lowes.
I knew I could get drill bits that would cut a hole in glass. Just didn't know where in Lowes to find them. Couldn't find a sales person to help me, so I asked a fellow customer who looked like he knew what to do as I was standing in the tool aisle looking at a wall of drill bits. The first thing he said to me was, "Honey, you aren't even looking at the drill bits."
Snort. How was I to know? If there is one place I don't belong, it's Lowes.
He couldn't find them, bless his heart for trying. So I took my husband back on the weekend and he found them for me. And he was a trooper by drilling a hole in this glass jar from Hobby Lobby for me on his only day off. He practiced on a few empty beer bottles first. :) He said it was "surprisingly easy." I just threaded the lights through the hole when he was done.
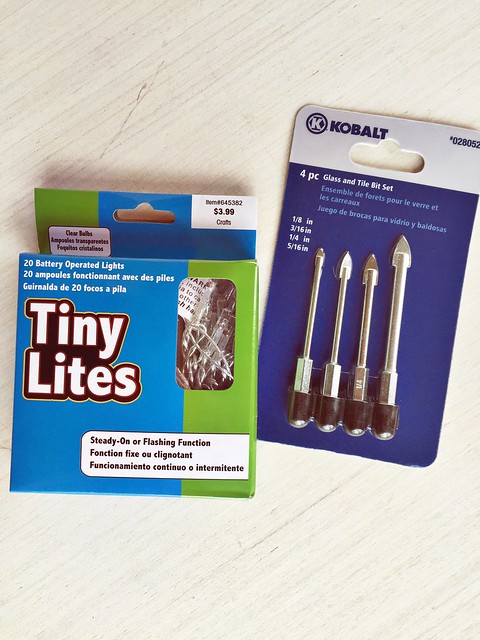
And just in case you want to do this yourself and don't want to be completely clueless in Lowes like I was (I've already fallen on that sword, no need for you to do it too), here'e the photo of the drill bits and mini lights (Hobby Lobby). You can find the bits in the tile and specialty tool section of Lowes and they were about $10 for the pack. My husband was more than happy to let me buy them for him with my business credit card. The least I could do for him.
Moving on to a few neat tricks with the new dies. Specifically the Hoopla: Circle Bases, Hoopla: Stitched Scallops, and the the Stitched Circle Holes Dies. These dies specifically coordinate with the Stitched Circles that were released two summers ago. You can find those here.
The largest Stitched Circle coordinates with the Hoopla: Stitched Scallops. You cut the quarter circle border four times and it wraps around the stitched circle. You have the option of adding individual scallops in different colors as well.
The Hoopla: Stitched Circle Bases are four dies that coordinate with all but the smallest Stitched Circle. They allow you to add a bottom base to your circle for an alternative color and base line.

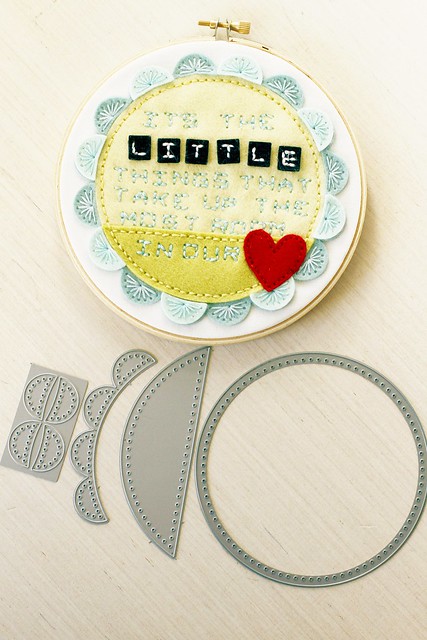
There are two new stitched alphabets with the Tiny Stitched Alphabet and Tiny Stitched Alphabet Blocks. These are based on a "nine-hole" square in which all the letters can be formed. Can't go any smaller then these! Here they spell out "It's the little things that take up the most room in our heart" on a six inch embroidery hoop. Muslin is used as the base layer.
You probably noticed that I stitched a flair into the Hoopla: Stitched Scallop. Just another option for you in addition to stitching the edge.
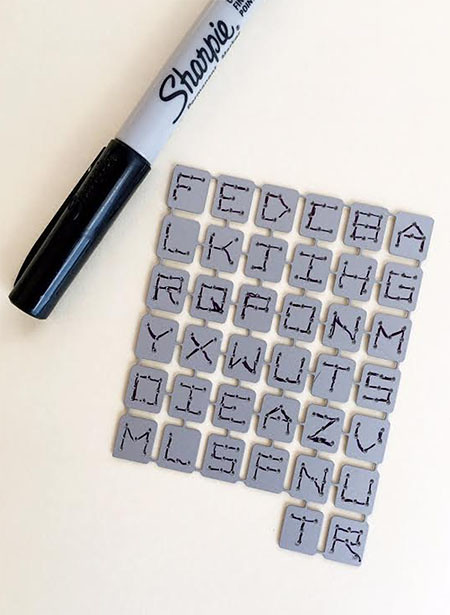
Here's a hint for the Stitched Tiny Alphabet Dies and Stitched Tiny Alphabet Block Dies. Use a fine tip Sharpie to mark the stitching guides on the backs. Helps you keep track of the letters too. Could be a bit confusing otherwise. Easy fix, especially if you do it before you cut them apart.
One last project for you featuring even more dies. We have the Stitched Circle Holes Dies. These are "holes only" dies that coordinate with the Stitched Circles. I know a lot of you have been asking for these! They also coordinate with the Hoopla: Stitched Bases.
On this project in particular, I had some fuchsia colored quilting fabric. I treated it with Heat N' Bond and cut the Hoopla: Stitched Circle Hole die (the largest) into it. The fabric was wider than my cutting mat, so I folded the extra over to make it fit. Sort of burrito-like with the die in the middle. Worked great. I also cut the Stitched Banner "holes only" dies into the fabric as well. (The Stitched Banner dies would look adorable on cards! I'll do that soon to show you.)
The largest Hoopla: Stitched Circle Base is cut out of Hawaiian Shores felt and sewn into the fabric on the 6" hoop along with rest of the circle outline created with the Hoopla: Stitched Circle Holes.
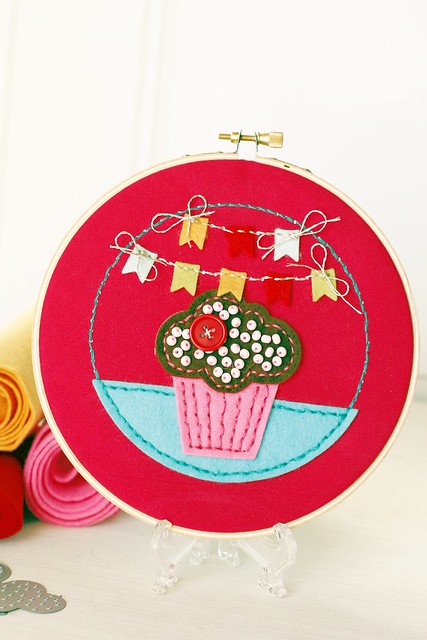
The Stitched Cupcake was used here. There is an optional detail to add seed beads as sprinkles. I had to try that. It was a game of "bead chicken" yesterday as I sewed these in. I had EXACTLY enough. Whew!
There is a separate die on the Stitched Cupcake for the frosting. It doubles as a nice cloud. Just FYI.
I'm hoping to make a few birthday-themed hoops that will get busted out on birthdays. Easy, homespun decorations.
Thanks for joining me today. All the new stitching dies will be available on April 15th at 10 PM EST at www.papertreyink.com. And here's even more Hoopla inspiration on Nicole's blog.
ERIN! I love the nightlight collection!! These are so much fun and I love what you've designed. I hit your blog first this morning because I had a sneaking suspicion you were behind today's introductions. Now I need to go see what Hoopla everyone else has created! :D
ReplyDeleteLowe's - that story is HILARIOUS! And that your DH 'practiced' on beer bottles is fantastic. I'm sure after your trip to Lowe's you needed a few. ;)
Erin, I love your stitching dies and projects. The nightlight is perfect for my granddaughters' bedroom, and I can think of some other seasonal effects for making a holiday special, making a mobile out of snowflakes with twinkle lights would be soooo pretty.
ReplyDeleteLOVE the nightlight idea, Erin! I want to make one for my little as she loves Twinkle, Twinkle, Little Star. All the new Hoopla dies are amazing and so easy to work with. Keep the ideas rolling, girl!
ReplyDeleteHOW CREATIVE, Erin!! I ADORE your night light! I'll bet your daughter LOOOOVES IT! Don't you get such a GOOD FEELING when you FINALLY get that project done & LOVE how it came out? LOL I also LOOOVE what you've done with the Stitched Scallop Die! BEAUTIFUL! :D
ReplyDeleteLove the colour scape that you used for the nightlight collection. I've never going to be a sewer, but I so admire your creativity. You're a genius, Erin!
ReplyDeleteGreat projects, Erin, and I'm sure all the stitchers are thrilled to death! I looked at the alphabet ones on Nichole's blog and couldn't see the first one being an A...thankfully you showed they're not in alphabetical order.
ReplyDeleteThat nightlight is awesome!! How creative! Love it
ReplyDeleteErin: Your samples are precious. I'm LOVING the wool felt and all your hard work is greatly apprecaited by me for one. I absolutely must have this beautiful set. Precious, my friend. Thanks for sharing your talents with us all. I can't express adequately how much I LOVE this.
ReplyDeleteKaren Letchworth
www.karen-mycuprunnethover.blogspot.com
Such creativity! All your projects are remarkable, especially the nightlight. That idea can be expanded to many different things inside for many occasions. And I was laughing while reading your Lowe's story. That is the exact reason why I always go with my dh.
ReplyDeleteThanks so much for creating the Hoopla collection. I second Kay Miller's request for little houses and trees. Also, could we please have some masculine motifs. I would really love an anchor that would fit in the square tray. I'm having so much fun making those trays! You're the best!!
ReplyDeleteYou're terrible Erin. I want everything. :D
ReplyDeleteHi Erin,
ReplyDeleteOMG Girl!!! You REALLY did it this time! I have dabble on hoop stitching but this will be sooooooo much easier and proportioned and excellent and gorgeous.....THANKS! The possibilities are endless... how about houses and craft stores and neighborhoods and Christmas and.....you get my drift right? Now that I have given you some ideas (not that you need them) how about a commission for mine?
Cariños,
María Alba